本文汇编代码可参见:
单链表
在本文中我们将着手实现基于链式结构的线性表:单链表。有关其具体定义在此跳过,直接步入具体实现。
对于一般单链表的节点我们采用最简单的$value + node$结构,一个用来存值,一个用来记录下一个节点。可改写为如下形式的C语言结构体。
typedef struct node {
    int val;
    struct node* next;
} Node;
创建
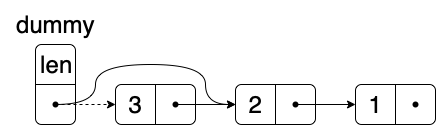
为了方便链表的存取、判空等操作,我们可以通过引入dummy节点的方式来实现。即该单链表永远只少拥有一个节点,该节点一般不存信息,只用来牵头。

而且得益于链表的存储方式,在创建一个空表时我们不需要指定其长度。因此,在创建流程中我们只需要创建一个普通的节点,并将其作为dummy节点返回即可,以后的所有操作皆基于该节点完成。
此外,一般情况下为了判断某个节点是否为dummy节点,我们常常会在初始化时为dummy节点指定一个在后续操作中永远不会使用的值。比如对于自然数列,我们就可以给dummy节点指定一个$-1$。在本文后续的操作过程中,为了能够在$O(1)$的时间内获取到链表的长度,我打算把dummy节点的值指定为当前表长。
# make llist
# parameters
#   nothing
# returns
#   a0 = address
make_llist:
    # deepen stack
    addi sp, sp, -4
    sw ra, 0(sp)
    # llist struct (len/val + next)
    li a0, 2
    call malloc
    sw zero, 0(a0)
    sw zero, 4(a0)
    # restore stack
    lw ra, 0(sp)
    addi sp, sp, 4
    ret
如此一来判空的操作只需要确认dummy节点的值是否为0即可。
# is empty
# parameters
#   a0 = address of llist
# returns
#   a0 = bool
llist_is_empty:
    lw a0, 0(a0) # a0 = len
    slti a0, a0, 1 # a0 = (len < 1) ? 1 : 0
    ret
头部插值/删除
由于我们每次操作链表时会最先获取到其头部的节点,所以不同于顺序表,对于链表来说,头部的操作会比较简单。比如头部插值,我们只需要创建一个新节点并连到相邻节点之间即可。

# prepend to head
# parameters
#   a0 = address of llist
#   a1 = value
# returns
#   nothing
llist_prepend:
    # deepen stack
    addi sp, sp, -12
    sw ra, 0(sp)
    sw a0, 4(sp) # store head of llist
    sw a1, 8(sp) # store the saving value
    call make_llist # a0 = addr of new node
    lw t0, 8(sp) # t0 = the saving value
    sw t0, 0(a0) # set value for new node
    lw a1, 4(sp) # a1 = head of llist
    lw a2, 4(a1) # a2 = original next
    sw a2, 4(a0) # set next for new node
    sw a0, 4(a1) # set next for head
    lw t0, 0(a1) # t0 = current len
    addi t0, t0, 1
    sw t0, 0(a1) # update len
    # restore stack
    lw ra, 0(sp)
    addi sp, sp, 12
    ret
同样的,头部删除就更加简洁,直接重新指定一下头部的连接,跳过一个节点即可。因此上述两个操作的时间复杂度均为$O(1)$。
# pop the head
# parameters
#   a0 = address of llist
# returns
#   a0 = value of head
llist_pop:
    # capacity check
    lw a1, 0(a0)  # a1 = len
    beq a1, zero, llist_pop_capacity_check_end
    addi a1, a1, -1
    sw a1, 0(a0) # update len
    lw a1, 4(a0) # next
    lw a2, 4(a1) # next next
    sw a2, 4(a0) # update next for haed
    lw a0, 0(a1) # a0 = value of next
llist_pop_capacity_check_end:
    ret
对于Python之类的有自动垃圾回收机制的高级程序语言来说,我们解除了对其的引用后环境就会自动帮我们回收。但如果使用C/C++之类的需要自己管控内存的语言的话,我们则需要free一下。鉴于我的模拟器环境里即便free了之后也不会重复利用该存储空间,所以这一步就直接省略了。
任意位置的插值/删除
链表操作的核心无非就是连接的操作。对于任意位置的插值/删除,只要我们找到了其前置节点再进行操作就可以避免连丢的情况了。所以我们可以先构建一个返回第$n-1$和第$n$个节点的函数,从而提高代码的复用率。
# find the nth
# parameters
#   a0 = address of llist
#   a1 = n
# returns
#   a0 = the prev node of nth
#   a1 = the nth node
llist_find_nth:
    li t0, 0 # curr idx
    mv t1, a1 # end idx
    lw a1, 4(a0) # curr node
llist_find_nth_loop_start:
    bge t0, t1, llist_find_nth_loop_end
    lw a0, 4(a0) # a0 = a0.next
    lw a1, 4(a1) # a1 = a1.next
    addi t0, t0, 1
    j llist_find_nth_loop_start
llist_find_nth_loop_end:
    ret
逻辑十分简单,用C语言改写的话不外乎就是一个for循环。
Node *prev = dummy, *curr = dummy.next;
for (int idx = 0; idx < n; ++idx) {
    prev = prev.next;
    curr = curr.next;
}
但这里我们一定需要注意,千万不能简单使用指针的加减法从而直接跳转n个地址的方法,因为链表的存储不一定是连续的。
那么借由上述的函数,insert和remove就可以轻松搞定了。
# insert to nth
# parameters
#   a0 = address of llist
#   a1 = n
#   a2 = value
# returns
#   nothing
llist_insert:
    # deepen stack
    addi sp, sp, -16
    sw ra, 0(sp)
    # capacity check
    blt a1, zero, llist_insert_capacity_check_fail
    lw t0, 0(a0) # t0 = len
    blt t0, a1, llist_insert_capacity_check_fail
    addi t0, t0, 1 # t0 += 1
    sw t0, 0(a0) # update len
    sw a2, 4(sp) # store the saving value
    call llist_find_nth # a0 = prev, a1 = curr
    sw a0, 8(sp) # store the prev
    sw a1, 12(sp) # store the curr
    call make_llist # a0 = addr of new node
    lw t0, 4(sp) # t0 = the saving value
    sw t0, 0(a0) # set value for new node
    lw a1, 12(sp) # a1 = curr
    sw a1, 4(a0) # set next for new node
    lw a1, 8(sp) # a1 = prev
    sw a0, 4(a1) # update next for prev
    j llist_insert_capacity_check_end
llist_insert_capacity_check_fail:
    # raise capacity warning
    mv a1, a0
    li a0, 4
    ecall
llist_insert_capacity_check_end:
    # restore stack
    lw ra, 0(sp)
    addi sp, sp, 16
    ret
remove函数里不需要额外创建新节点,所以代码会更加简短。
# remove the nth item
# parameters
#   a0 = address of llist
#   a1 = n
# returns
#   nothing
llist_remove:
    # deepen stack
    addi sp, sp, -4
    sw ra, 0(sp)
    # capacity check
    blt a1, zero, llist_remove_capacity_check_fail
    lw t0, 0(a0) # t0 = len
    bge a1, t0, llist_remove_capacity_check_fail
    addi t0, t0, -1
    sw t0, 0(a0) # update len
    call llist_find_nth # a0 = prev, a1 = curr
    lw a1, 4(a1) # a1 = a1.next
    sw a1, 4(a0) # a0.next = a1.next
    j llist_remove_capacity_check_end
llist_remove_capacity_check_fail:
    # raise capacity warning
    mv a1, a0
    li a0, 4
    ecall
llist_remove_capacity_check_end:
    # restore stack
    lw ra, 0(sp)
    addi sp, sp, 4
    ret
由于每次操作时我们都会至多扫描遍整个链表,所以上述两个操作的时间复杂度为$O(n)$。
指定元素查找
有了上面的基础,查找操作几乎就是水到渠成了。同时,每次操作我们也都至多遍历n个元素,所以查找操作的时间复杂度也是$O(n)$。
# find the given value
# parameters
#   a0 = address of llist
#   a1 = value
# returns
#   a0 = index
llist_find:
    lw a2, 4(a0) # a2 = curr
    li a0, 0 # a0 = index of curr
llist_find_loop_start:
    beq a2, zero, llist_find_loop_end
    lw t0, 0(a2) # t0 = a2.val
    beq t0, a1, llist_find_loop_end
    addi a0, a0, 1 # update index of curr
    lw a2, 4(a2) # a2 = a2.next
    j llist_find_loop_start
llist_find_loop_end:
    # result chcek
    bne a2, zero, llist_find_result_check_end
    li a0, -1
llist_find_result_check_end:
    ret
高阶函数
对于高阶函数的实现和上一篇顺序表的方式都差不多,也算是对以上内容的一个综合演练。以下为实际代码。
# map
# parameters
#   a0 = address of llist
#   a1 = function for mapping
#   a2 = in place option (0 for false)
# returns
#   a0 = address of mapped llist
llist_map:
    # deepen stack
    addi sp, sp, -24
    sw ra, 0(sp)
    sw a1, 4(sp) # store map func
    sw a2, 8(sp) # store inplace option
    lw a1, 4(a0)
    sw a1, 12(sp) # store the curr node of src llist
    # prepare dst llist
    beq a2, zero, llist_map_inplace_check_end
    call make_llist # a0 = addr of dst llist
llist_map_inplace_check_end:
    sw a0, 16(sp) # store address of dst llist
    sw a0, 20(sp) # store the prev node of dst llist
llist_map_loop_start:
    lw a0, 12(sp) # a0 = curr node of src llist
    beq a0, zero, llist_map_loop_end
    lw t0, 8(sp) # t0 = inplace?
    beq t0, zero, llist_map_loop_inplace_check_end
    call make_llist # a0 = addr of new node
llist_map_loop_inplace_check_end:
    lw a1, 20(sp) # a1 = prev node of dst llist
    sw a0, 4(a1) # prev.next = a0
    lw a0, 12(sp) # a0 = curr node of src llist
    lw a1, 4(a0) # a1 = curr.next
    sw a1, 12(sp) # update curr node of src llist
    lw a0, 0(a0) # a0 = a0.val
    lw t0, 4(sp) # t0 = map func
    jalr t0 # a0 = func(curr.val)
    lw a1, 20(sp) # a1 = prev node of dst llist
    lw a1, 4(a1) # a1 = curr node of dst llist
    sw a0, 0(a1) # a1.val = a0
    sw a1, 20(sp) # update prev node of dst llist
    j llist_map_loop_start
llist_map_loop_end:
    # update len for dst llist
    li t0, 0 # len of dst llist
    lw a0, 16(sp) # a0 = addr of dst llist
    lw a0, 4(a0) # a0 = curr node of dst llist
llist_map_len_loop_start:
    beq a0, zero, llist_map_len_loop_end
    addi t0, t0, 1 # update len of dst llist
    lw a0, 4(a0) # update curr node of dst llist
    j llist_map_len_loop_start
llist_map_len_loop_end:
    lw a0, 16(sp) # a0 = addr of dst llist
    sw t0, 0(a0) # a0.len = t0
    # restore stack
    lw ra, 0(sp)
    addi sp, sp, 24
    ret
在map函数中,如果是非原地置换的话我们需要随时开辟新的节点,所以这部分的处理就稍许麻烦。我们不仅需要一个一个地判断,同时为了确保判断信息的持续性我们也要特意在函数栈上开辟额外的空间去存储。而且,在操作的最后我们还需要做一些善后工作:为输出的链表更新一下实际长度。
# filter
# parameters
#   a0 = address of llist
#   a1 = function for filtering
# returns
#   a0 = address of filtered llist
llist_filter:
    # deepen stack
    addi sp, sp, -24
    sw ra, 0(sp)
    sw a1, 4(sp) # store filter func
    lw a0, 4(a0)
    sw a0, 8(sp) # store the curr node of src llist
    # prepare dst llist
    call make_llist # a0 = addr of dst llist
    sw a0, 12(sp) # store address of dst llist
    sw a0, 16(sp) # store the prev node of dst llist
llist_filter_loop_start:
    lw a1, 8(sp) # a0 = curr node of src llist
    beq a1, zero, llist_filter_loop_end
    lw a0, 0(a1) # a0 = curr.val
    lw a1, 4(a1) # a1 = a1.next
    sw a1, 8(sp) # update curr node of src
    sw a0, 20(sp) # store curr.val
    lw t0, 4(sp) # t0 = filter func
    jalr t0 # a0 = func(curr.val)
    beq a0, zero, llist_filter_check_end
    call make_llist # a0 = addr of new node
    lw a1, 20(sp) # a1 = curr.val
    sw a1, 0(a0) # a0.val = a1
    lw a1, 16(sp) # a1 = prev node of dst llist
    sw a0, 4(a1) # prev.next = a0
    sw a0, 16(sp) # update prev node of dst llist
llist_filter_check_end:
    j llist_filter_loop_start
llist_filter_loop_end:
    # update len for dst llist
    li t0, 0 # len of dst llist
    lw a0, 12(sp) # a0 = addr of dst llist
    lw a0, 4(a0) # a0 = curr node of dst llist
llist_filter_len_loop_start:
    beq a0, zero, llist_filter_len_loop_end
    addi t0, t0, 1 # update len of dst llist
    lw a0, 4(a0) # update curr node of dst llist
    j llist_filter_len_loop_start
llist_filter_len_loop_end:
    lw a0, 12(sp) # a0 = addr of dst llist
    sw t0, 0(a0) # a0.len = t0
    # restore stack
    lw ra, 0(sp)
    addi sp, sp, 24
    ret
对于筛选操作,由于必定是创建新节点,所以主循环里会稍稍简练一点。
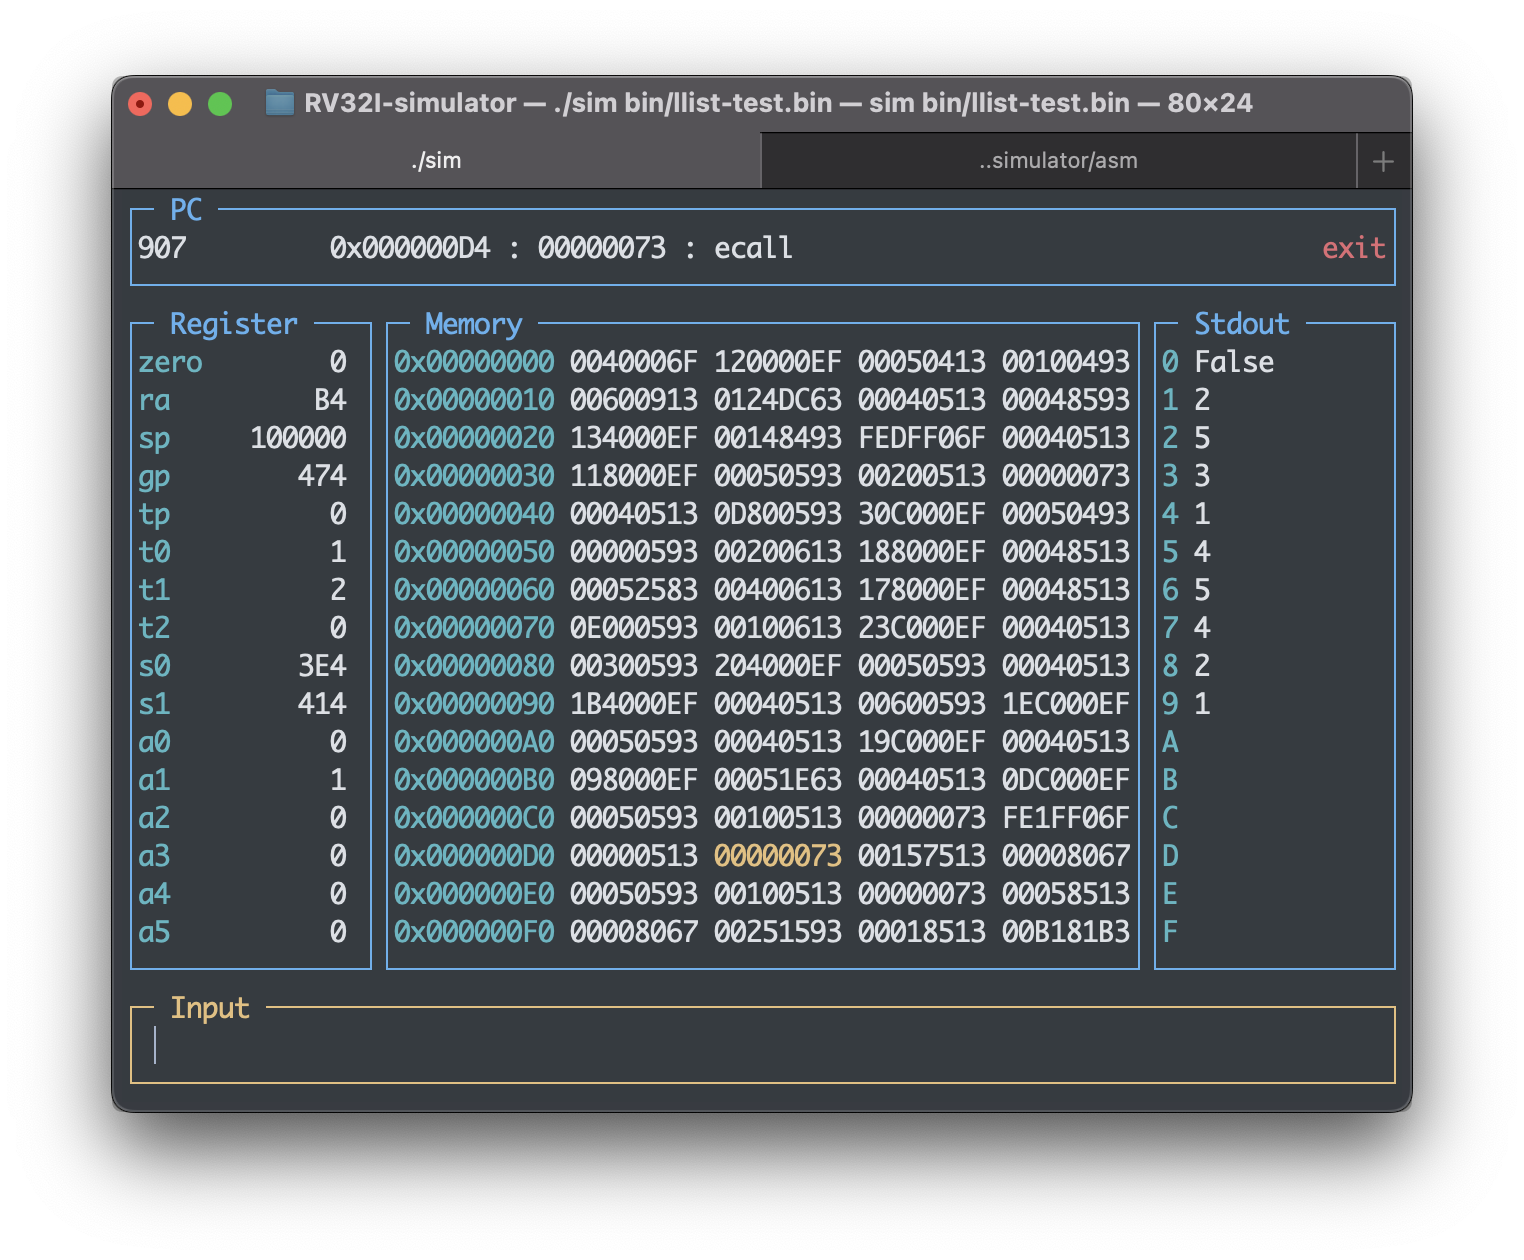
测试
具体测试流程和上一篇一样,只是改变了一下函数名。
由于存储顺序不同,我们将会看到如下的输出(途中会出现一次在删除不存在的6时发生的容量警告)。