本文汇编代码可参见:
汇编层级下的数据结构
所谓数据结构即一种既定的数据访问方式。得益于高级程序语言的抽象,我们可以方便准确地实现所想定的目标。然而在抽象层级较低的汇编语言里,由于不存在任何基本数据类型(至少在C语言中我们尚且可以把数组、结构体当作最精简的根基),上述目标的实现将变得十分具有挑战性。
本系列将以C语言的思考+实现方式为根基具体展开,通过个人开发的模拟器来屏蔽掉一些系统级的问题,以便能更好地着重于汇编层级的实现。
本文我们从C语言中唯二的基本数据类型:列表开始。
列表的基本内容
列表的生成
在C语言代码中根据定义位置和方式的不同,我们将会得到三种列表:静态列表、栈上的列表和动态列表。
静态列表即在全局位置声明的列表。
#include <stdio.h>

int array[10]; // here

int main() {
    ...
}
这样的列表会被分配到静态存储空间保存,所以我们必须明确指定列表长度。此外全局声明出来的存储空间可以在程序的整个生命周期内一直使用。
栈上的列表为函数中静态声明的列表。
void func() {
    int array[10]; // here
}
与静态列表十分类似,我们也需要明确指定其大小,区别来自于其使用的场景。全局声明的静态列表意味着我们将有可能在程序的任意位置随时使用它,所以该存储空间不能被随意回收。与之相对,某一函数内声明的列表则意味着该列表只会在那个函数内被使用,所以函数调用结束后改存储空间就不再需要被保留了。因此,函数内声明的列表会被分配在函数的调用栈上,随着函数的调用而产生,随其结束而被回收。此外,因为main函数贯穿始终,所以main函数内的静态声明也可当作全局的方式使用。
动态列表则是在程序运行过程中即时申请、即时分配而来的列表。
int* make_array(int length) {
    return (int*)malloc(length * sizeof(int)); // here
}
由于其所占用的空间不定,所以无法被包含到实际执行的程序文件内,只能在执行的过程中临时向上层的管理系统申请(为了保证存储空间的安全使用一般是如此),由管理系统将该区域映射到程序静态空间的上部(堆)。C语言的标准库提供了malloc、relloc、calloc等函数供开发者使用,实际则为对brk、mmap等系统调用(system call)的调用。
列表的使用
因为列表的本质就是一片连续的存储空间,所以我们所能做的操作无外乎“改”和“查”。
汇编实现
因为上述提及的三种列表只在生成方式上有差别,所以我们先实现动态列表,剩下的内容浅尝辄止即可。
我所开发的模拟器采用了普通的static-heap-stack内存结构,所有数据均使用32bit(1word)保存。而且没有设计管理内存权限的模块,所以相当于heap所对应的动态存储空间是可以无需申请完全自由使用的(堆顶由寄存器gp保存)。为了着重于列表本身的操作,内存分配函数则以标准库函数的方式统一实现。malloc函数如下
malloc:
    addi sp, sp, -4
    sw a1, 0(sp)
    slli a1, a0, 2
    mv a0, gp
    add gp, gp, a1
    lw a1, 0(sp)
    addi sp, sp, 4
    ret
核心思路与system call的brk类似,以提高堆顶的方式开辟空间。调用时以a0寄存器的值当作word数,提高堆顶后,将原始堆顶保存到a0后返回。为了方便后续操作array[n] = ?和? = array[n]也可以一并用标准库函数实现。
# set the nth item
# parameters
#   a0 = address of head
#   a1 = n
#   a2 = value
# returns
#   nothing
set_nth:
    slli a1, a1, 2
    add a0, a0, a1
    sw a2, 0(a0)
    ret

# get the nth item
# parameters
#   a0 = address of head
#   a1 = n
# returns
#   a0 = a0[a1]
get_nth:
    slli a1, a1, 2
    add a0, a0, a1
    lw a0, 0(a0)
    ret
一维列表示例
有了上述三个标准库函数我们便可以着手创建并打印一个一维列表试试了。目标是重现如下C语言代码。
int* array = (int*)malloc(5 * sizeof(int));
for (int i = 0; i < 5; ++i)
    array[i] = i;
for (int i = 0; i < 5; ++i)
    printf("%d\n", array[i]);
总共分三段,分配空间+初始化数据+打印,分别对应了上一节中的三个标准库函数。具体实现如下。
    .globl main

    .text
main:
    # create a 5words-array
    li a0, 5
    call malloc
    mv s0, a0 # s0 = u32[5]

    # init every item with its index
    li s1, 0
    li s2, 5
init_loop_start:
    bge s1, s2, init_loop_end
    mv a0, s0
    mv a1, s1
    mv a2, s1
    call set_nth # s0[s1] = s1
    addi s1, s1, 1
    j init_loop_start
init_loop_end:

    # print out each item
    li s1, 0
    li s2, 5
print_loop_start:
    bge s1, s2, print_loop_end
    # access item
    mv a0, s0
    mv a1, s1
    call get_nth
    # print int
    mv a1, a0
    li a0, 1
    ecall
    addi s1, s1, 1
    j print_loop_start
print_loop_end:

    # exit
    li a0, 0
    ecall
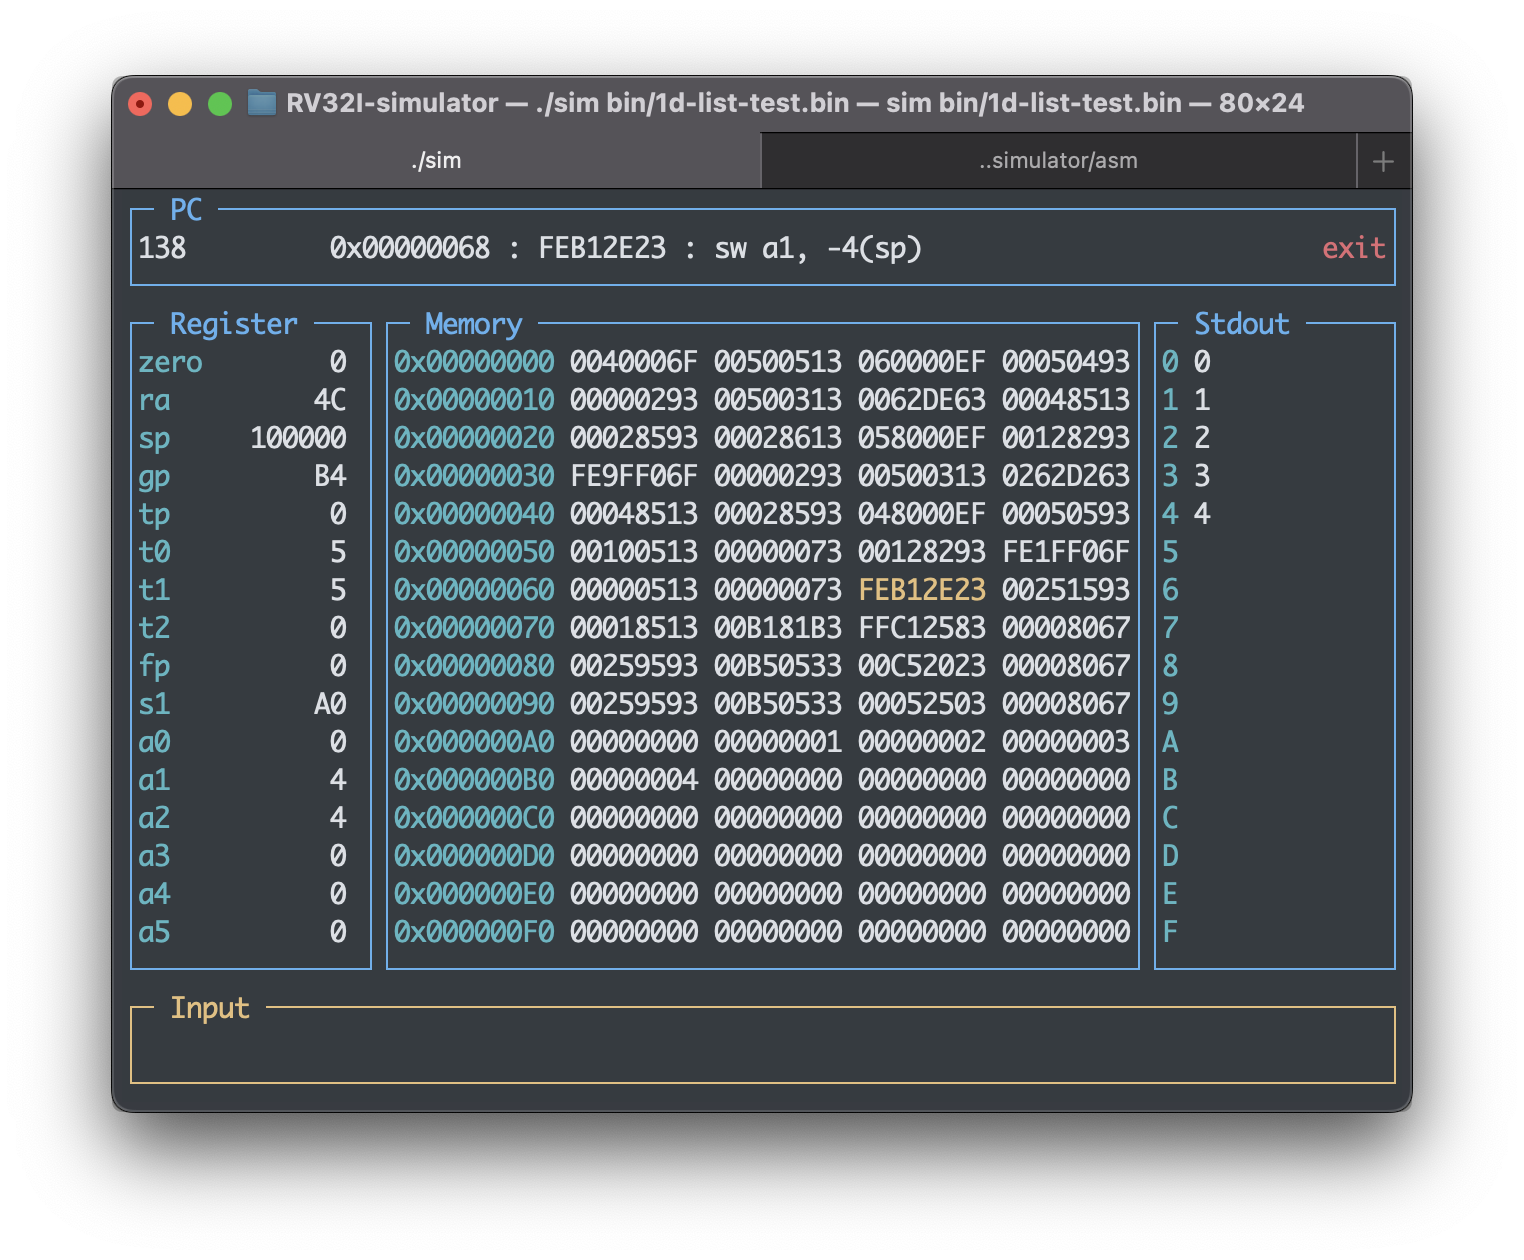
执行后可在模拟器画面右侧见得输出结果。此外列表所存的0~4这五个数据也的确按照预想连续排布在了0xA0~0xB0的地址上。
$ cd asm
$ python3 asm.py test-codes/1d-array-test.s lib/mlib.s
$ cd ..
$ make
$ ./sim bin/1d-array-test.bin
此外,全局静态列表的声明可以通过汇编语言的数据标签实现,用伪指令la获取其地址。
    .data
static-array:
    .word 0, 1, 2, 3, 4

    .text
    la a0, static-array
栈上的列表则可以在函数使用栈时人为扩充一下即可。
func:
    addi sp, sp, -12 # one for ra, three for an array
    sw ra, 0(sp)
    addi a0, sp, 4 # use a0 as the head of array
    ...
    lw ra, 0(sp)
    addi sp, sp, 12
    ret
二维列表示例
接下来我们尝试一下分散式二维列表(4行2列)的操作。目标是重现如下C语言代码。
// malloc
int** array = (int**)malloc(4 * sizeof(int*));
for (int row_idx = 0; row_idx < 4; ++row_idx)
    array[row_idx] = (int*)malloc(2 * sizeof(int));
// init
for (int row_idx = 0; row_idx < 4; ++row_idx)
    for (int col_idx = 0; col_idx < 2; ++col_idx)
        array[row_idx][col_idx] = row_idx + col_idx;
// print out
for (int row_idx = 0; row_idx < 4; ++row_idx)
    for (int col_idx = 0; col_idx < 2; ++col_idx)
        printf("%d\n", array[row_idx][col_idx]);
思路与一维列表完全相同,注意寄存器的使用、避免忘记自增等运算即可。具体实现如下。
    .globl main

    .text
main:
    # create a separate 4(row)*2(col)words-array
    li a0, 4
    call malloc
    mv s0, a0
    # init each row
    li s1, 0 # row-idx
    li s2, 4 # max-row
init_row_loop_start:
    bge s1, s2, init_row_loop_end
    li a0, 2
    call malloc
    mv a2, a0
    mv a0, s0
    mv a1, s1
    call set_nth
    addi s1, s1, 1
    j init_row_loop_start
init_row_loop_end:

    # init every item with row-idx + col-idx
    li s1, 0 # row-idx
    li s2, 4 # max-row
init_outer_loop_start:
    bge s1, s2, init_outer_loop_end
    li t2, 0 # col-idx
    li t3, 2 # max-col
init_inner_loop_start:
    bge t2, t3, init_inner_loop_end
    # set row address
    mv a0, s0
    mv a1, s1
    call get_nth
    # set column index
    mv a1, t2
    # set value (row + col)
    add a2, s1, t2
    call set_nth
    addi t2, t2, 1
    j init_inner_loop_start
init_inner_loop_end:
    addi s1, s1, 1
    j init_outer_loop_start
init_outer_loop_end:

    # print out each item
    li s1, 0 # row-idx
    li s2, 4 # row-max
print_outer_loop_start:
    bge s1, s2, print_outer_loop_end
    li t2, 0 # col-idx
    li t3, 2 # cal-max
print_inner_loop_start:
    bge t2, t3, print_inner_loop_end
    # access row
    mv a0, s0
    mv a1, s1
    call get_nth
    # access col
    mv a1, t2
    call get_nth
    # print int
    mv a1, a0
    li a0, 1
    ecall
    addi t2, t2, 1
    j print_inner_loop_start
print_inner_loop_end:
    addi s1, s1, 1
    j print_outer_loop_start
print_outer_loop_end:

    # exit
    li a0, 0
    ecall
执行后可在模拟器画面右侧见得输出结果。查看存储空间内容可发现0x104~0x110上的确保存的是每个行的头地址。
$ cd asm
$ python3 asm.py test-codes/2d-array-test.s lib/mlib.s
$ cd ..
$ ./sim bin/2d-array-test.bin
